
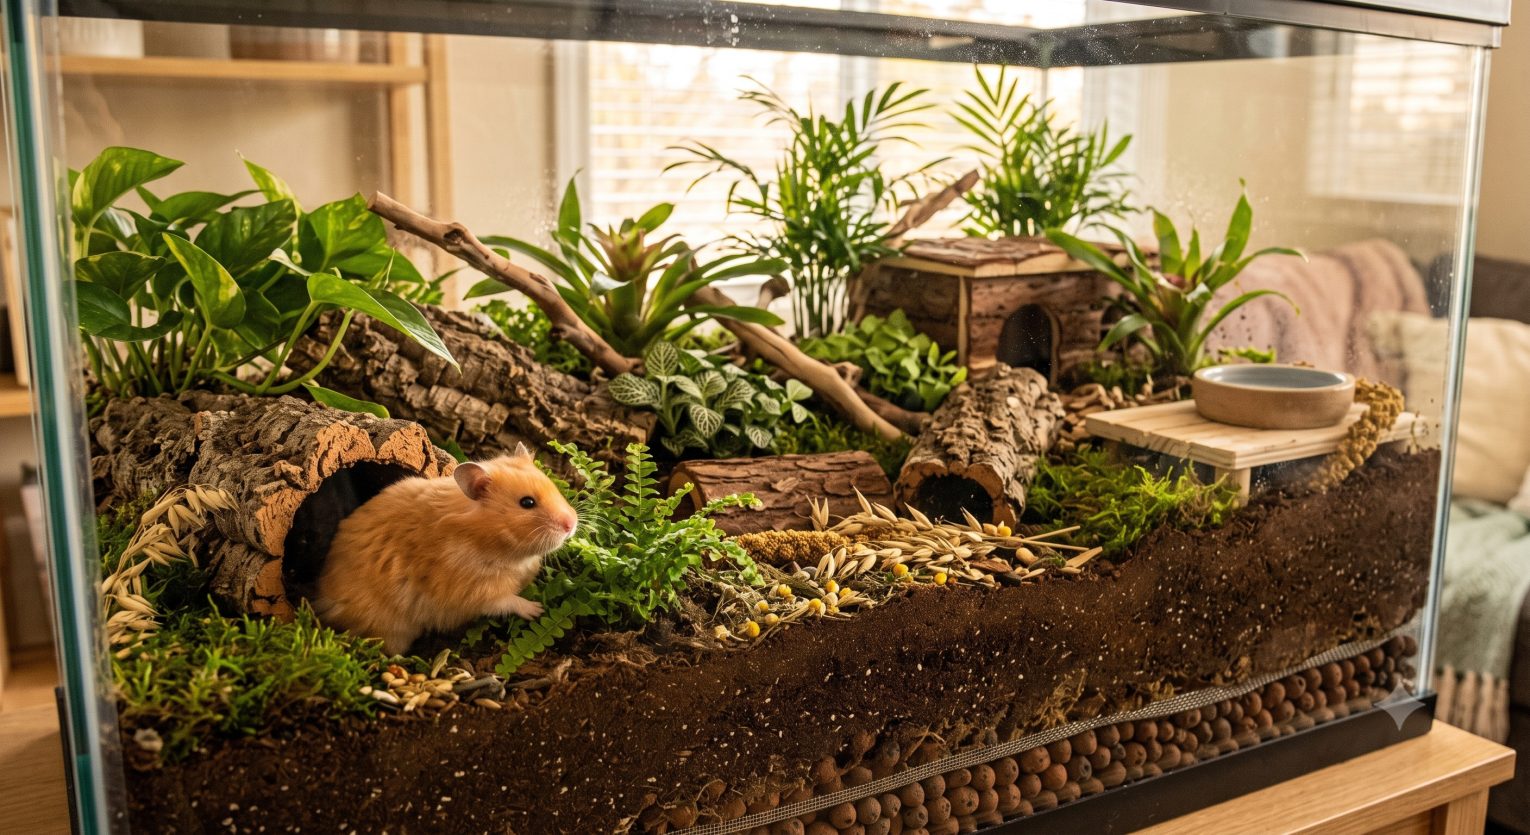
A bioactive hamster enclosure is a living ecosystem that mimics a hamster’s natural habitat—combining a deep burrowing substrate, live plants, and a microfauna cleanup crew of springtails and isopods that break down waste and keep the environment balanced. Done correctly, a bioactive setup requires less frequent full cleans than a standard cage, provides significantly more enrichment for the hamster, and produces a visually striking enclosure that functions as a self-maintaining habitat.
A bioactive enclosure is not a shortcut—the initial setup is more complex and more expensive than a standard cage. But for owners willing to invest the time upfront, the result is the closest approximation to a wild hamster habitat achievable in a home setting, and one that demonstrably reduces stereotypic stress behavior compared to barren commercial cages.
A bioactive setup builds on the core hamster care foundations covered in our Hamster Care Guide— including minimum enclosure size, bedding depth, and wheel requirements. Before setting up a bioactive enclosure, that guide covers everything you need to know about basic hamster husbandry. This article is also part of our Small Pet Care Guide—the complete small pets hub.
(💡 A well-established bioactive enclosure functions as a self-maintaining ecosystem—the cleanup crew processes waste while the hamster benefits from natural burrowing and foraging enrichment.)
Table of Contents
What Makes an Enclosure “Bioactive”
A standard hamster cage is a static environment— bedding absorbs waste until a full clean is required. A bioactive enclosure is a functioning micro-ecosystem:
The three components that make it bioactive:
- Naturalistic substrate — a layered soil mix that supports plant root growth and microfauna habitation, deep enough for natural burrowing (minimum 20–30 cm / 8–12 in).
- Live plants — rooted plants provide hiding spots, foraging opportunities, and contribute to air quality.
- Cleanup crew — colonies of springtails and isopods that live in the substrate and break down waste, uneaten food, and organic matter before it can build up to harmful levels.
The cleanup crew is what distinguishes bioactive from simply “planted.” Without springtails and isopods processing waste, a planted enclosure still requires the same maintenance schedule as a standard cage—with the added complication of live plants.
(🩺 Vet’s Note: “Bioactive enclosures done correctly represent the most welfare-positive housing option available for pet hamsters. The deep substrate, foraging enrichment, and environmental complexity address nearly every welfare concern associated with standard commercial caging. The caveat is ‘done correctly’—an unsuccessful bioactive setup with mold, poor drainage, or wrong plants can create welfare problems rather than solve them”—LovingPetsGuide Veterinary Advisor.)
Before You Start: Requirements and Realistic Expectations
📏 Minimum Enclosure Size for Bioactive
The deep substrate requirement for a bioactive enclosure means the container must be significantly taller than a standard hamster cage.
✅ Recommended container dimensions:
- Floor area: Minimum 80 × 50 cm (31 × 20 in) for Syrian hamsters — same as standard minimum.
- Height: Minimum 50–60 cm (20–24 in) to accommodate 20–30 cm of substrate plus plants and headroom.
🏆 Best container types:
- Glass terrarium/vivarium — the standard choice for bioactive setups. Glass retains humidity better than wire, allows full visibility, and is easy to clean between builds.
- Modified storage bins — a budget alternative using deep plastic storage containers. Less aesthetically striking but functional.
- Purpose-built hamster enclosures — some larger commercial enclosures work if deep enough.
❌ What does not work:
- Standard wire cages — substrate falls through and insufficient height for deep substrate.
- Most commercially sold “hamster starter kits” — too small and too shallow.
📊 Cost and Time Expectations
💰 Initial setup cost (approximate):
| Container (depending on size): | $60–$250 |
| Substrate materials: | $25–$50 |
| Plants: | $12–$40 |
| Cleanup crew (springtails + isopods): | $12–$30 |
| Hardscape (cork bark, wood, stone): | $18–$50 |
| Total: | $120–$380 |
⏱️ Establishment period: 4–6 weeks before introducing the hamster—plants need time to root and the cleanup crew needs time to establish a viable colony.
Bioactive Hamster Enclosure Step-by-Step Setup
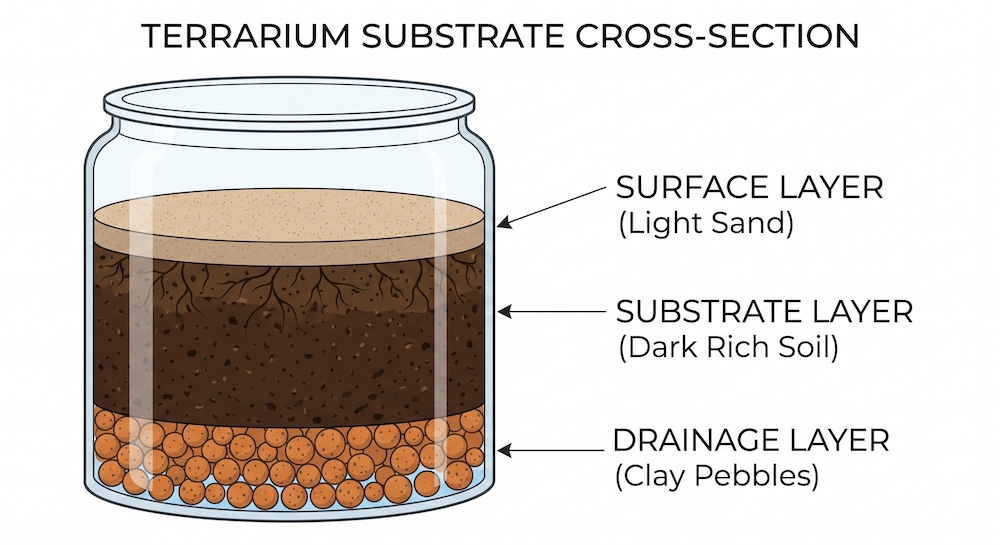
The drainage layer at the bottom is essential—without it, water collects, the substrate becomes anaerobic, and the cleanup crew cannot survive.
🐾 Step 1: The Drainage Layer
The drainage layer sits at the bottom of the enclosure and prevents the substrate above from becoming waterlogged, which causes mold and anaerobic conditions that kill the cleanup crew.
🪨 Materials:
- LECA (Lightweight Expanded Clay Aggregate) — the standard choice, approximately 3–5 cm (1–2 in) deep.
- Alternatively: gravel, pea gravel, or horticultural grit.
⚙️ Optional: A mesh divider between the drainage layer and substrate (fine mesh or landscaping fabric) prevents the two layers from mixing over time as the hamster burrows.
📏 Depth: 3–5 cm (1–2 in).
🐾 Step 2: The Substrate Mix
The substrate is the foundation of the entire bioactive build. It must be:
- ✔️ Deep enough for burrowing (20–30 cm / 8–12 in).
- ✔️ Stable enough for tunnel integrity—burrows should not collapse.
- ✔️ Moisture-retaining but not waterlogged.
- ✔️ Free of fertilizers, pesticides, and perlite that are harmful to hamsters.
📰 Plant safety information in this article was verified against the ASPCA Animal Poison Control Center toxic plant database at aspca.org/pet-care/aspca-poison-control/toxic-and-non-toxic-plants. Pothos (Epipremnum aureum), Dracaena, Monstera, and Ivy are all confirmed toxic by ASPCA. Perlite respiratory hazard information is consistent with EFSA safety assessments. Bioactive establishment timelines reflect established community practice documented across bioactive keeping communities including Dendroboard.
✅ Recommended substrate recipe:
- 60% organic topsoil (perlite-free, no added fertilizers).
- 20% coconut coir (adds moisture retention and burrowing stability).
- 20% play sand or children’s sand (adds structure, prevents tunnel collapse).
⚙️ Optional additions (small amounts):
- Orchid bark or leaf litter on the surface layer for microfauna habitat.
- Dried sphagnum moss in patches for moisture spots.
📏 Depth: Fill to 20–30 cm (8–12 in) minimum. This is significantly more substrate than most owners expect—a 80 × 50 cm enclosure filled to 25 cm depth requires approximately 100 liters of substrate mix.
🐾 Hamster Bedding & Substrate 🐾
🪵 Paper-Based & Natural Substrate—For the surface nesting layer of a bioactive enclosure, Carefresh or similar paper-based bedding provides the soft nesting material hamsters prefer for their sleeping area on top of the soil mix. Chewy carries large volume bags suitable for the quantities needed in a bioactive build.
🐾 Step 3: The Cleanup Crew
The cleanup crew is what makes the enclosure bioactive. Without them, it is simply a planted cage.
Tropical Springtails (Folsomia candida or similar):
- Tiny white arthropods, barely visible to the naked eye.
- Feed on mold, fungi, decomposing organic matter, and waste.
- Thrive in moist substrate conditions.
- Completely harmless to hamsters.
- How to add: Purchase a culture, tip contents directly onto the substrate surface.
- Colony quantity: One culture is enough to start—the colony self-regulates.
Isopods (Dwarf White Isopods preferred for hamster enclosures):
- Small crustaceans that break down waste and dead plant matter.
- Dwarf White Isopods are preferred over larger species—less likely to disturb a sleeping hamster.
- How to add: Place a small cluster under cork bark or in a moist corner of the enclosure.
- Colony quantity: 10–25 individuals to start.
❔Where to source cleanup crew:
- Specialist reptile and bioactive suppliers (online).
- Hamster community groups and forums often have local sellers.
- Some exotic pet shops carry springtail and isopod cultures.
⏱️ Timeline: Allow 4–6 weeks for the cleanup crew to establish a viable colony before introducing the hamster.
🐾 Step 4: Live Plants
Live plants provide hiding spots, foraging enrichment, chewing opportunities, and contribute to the enclosure’s visual appeal. Not all plants are hamster-safe—the wrong plant can be toxic if chewed or ingested.
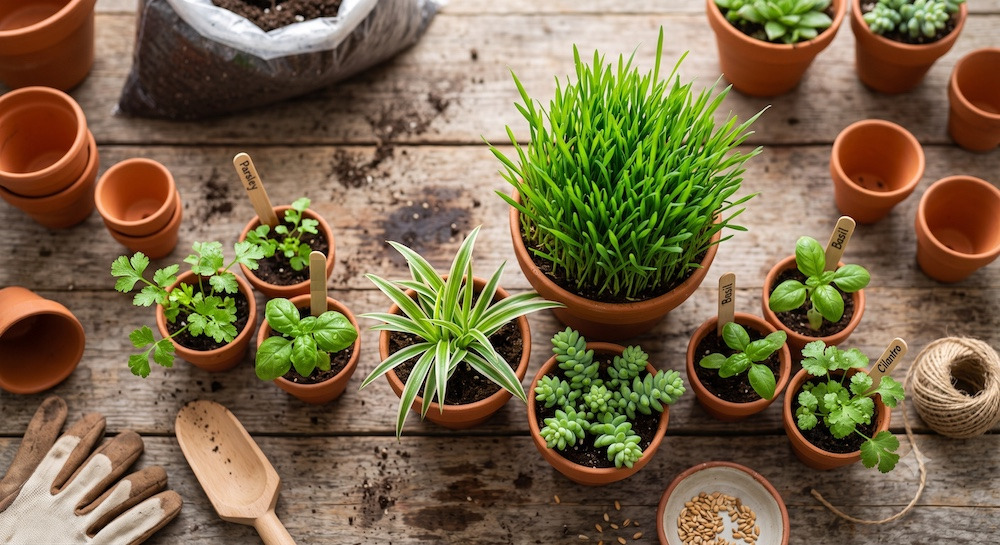
Planting tips:
- Plant before adding the cleanup crew—springtails need time to establish before the hamster’s activity disrupts the surface.
- Rinse plant roots thoroughly before planting— commercial plant soil often contains fertilizers and pesticides.
- Accept that hamsters will chew, dig up, and generally destroy some plants—this is normal. Edible plants in particular will be consumed. Replant as needed.
(💡 Choose a mix of robust plants that can handle some disturbance and edible herbs that can be replaced when consumed.)
✅ Safe plants for hamster bioactive enclosures:
| Plant | Notes |
|---|---|
| Wheatgrass / Cat Grass | Fast-growing, edible, easy to establish |
| Spider Plant (Chlorophytum comosum) | Robust, non-toxic, spreads well |
| Basil | Edible herb, replace when eaten |
| Cilantro (Coriander) | Edible herb, replace when eaten |
| Dill | Edible herb |
| Parsley | Edible herb (limited—high calcium) |
| Sedum (Stonecrop) | Hardy succulent, non-toxic |
| Haworthia | Hardy succulent, non-toxic |
| Petunia | Non-toxic flowering plant |
| Viola / Pansy | Non-toxic, edible flowers |
| Dandelion | Non-toxic, edible, highly nutritious |
| Clover | Non-toxic, edible |
| Plantain (Plantago major) | Non-toxic, edible leaves |
| Strawberry plant | Non-toxic, fruit edible as treat |
❌ Plants to avoid completely:
| Plant | Why |
|---|---|
| Pothos (Epipremnum aureum) | Toxic—calcium oxalate crystals |
| Ivy (all species) | Toxic |
| Aloe Vera | Toxic if ingested |
| Dracaena | Toxic |
| Monstera | Toxic—calcium oxalate crystals |
| Tulip / Daffodil | Toxic bulb plants |
| Foxglove | Toxic |
| Lily (most species) | Toxic |
| Succulents with milky sap | Potentially toxic |
🐾 Step 5: Hardscape and Enrichment
Hardscape provides structure, hiding spots, and tunneling opportunities:
🟤 Cork bark:
- The single best hardscape material for bioactive enclosures.
- Provides microfauna habitat underneath.
- Safe to chew.
- Creates natural-looking tunnels and hides.
- Available as flat pieces, half-logs, and tubes.
🪵 Wooden items:
- Driftwood, vine wood, apple branches (dried).
- Always check wood species is safe before including—some woods are toxic.
🪨 Stone:
- Slate, sandstone, or natural stone tiles create naturalistic platforms and weight-bearing surfaces above burrows.
🍂 Enrichment items:
- Dried herbs scattered through the substrate for foraging.
- Seed mix buried in the substrate.
- Pine cones (from pesticide-free areas).
- Dried leaves (oak, beech, hazel — avoid evergreen leaves).
🐾 Step 6: The Silent Wheel
Every bioactive enclosure still needs a silent, solid-surface wheel—regardless of how enriched the environment is. The bioactive setup addresses foraging and burrowing needs but cannot replicate the running distance a hamster covers naturally.
🎡 Wheel specifications (same as standard setup):
- Minimum 28 cm (11 in) diameter for Syrians.
- Solid surface — never wire or mesh.
- Silent bearing.
For wheel options, see Hamster Care Guide which covers wheel requirements in detail.
🐾 Silent Hamster Wheels 🐾
🎡 Silent Running Wheels—No bioactive enclosure is complete without a silent, solid-surface wheel of at least 28 cm (11 in) for Syrian hamsters. The naturalistic environment addresses enrichment needs but the wheel remains essential for the physical activity hamsters require every night.
Maintenance Schedule
One of the main appeals of a bioactive setup is reduced maintenance—but “less maintenance” does not mean “no maintenance.”
📅 Daily:
- Check water bottle and food.
- Remove any obviously uneaten perishable food (cooked egg, fresh vegetables) before it molds.
- Observe the hamster’s activity and health.
📆 Weekly:
- Spot-clean the toilet corner — hamsters designate one area for toileting. This area is not processed by the cleanup crew efficiently and should still be scooped weekly with a small scoop.
- Check plant health — remove any dead or molding leaves.
- Check substrate moisture in the burrowing area — should be damp enough for tunnel stability but not wet.
🗓️ Monthly:
- Light surface refresh — add small amount of fresh substrate to areas that have been heavily used.
- Feed the cleanup crew — a small piece of dried leaf litter, dried mushroom, or fish flakes placed under cork bark supplements their food when organic waste input is low.
🗓️ Every 3–6 months:
- Full surface layer refresh — the top 5 cm of substrate can be removed and replaced with fresh mix without disturbing burrows.
- Replant any consumed or dead plants.
- Check drainage layer through the glass side — if water is pooling, the substrate may need partial replacement.
Full rebuild: A well-maintained bioactive enclosure can go 12–18 months without a full substrate replacement—significantly longer than the monthly full cleans required for standard setups.
Troubleshooting Common Problems
| Mold appearing on the surface: Usually indicates too much moisture or insufficient springtail colony. Reduce misting if applicable, increase ventilation slightly, and add more springtails. |
| Substrate collapsing (tunnels caving in): The mix is too dry or lacks enough coconut coir for cohesion. Lightly mist the burrowing area and consider mixing in more coir on the next partial refresh. |
| Plants keep dying: Most commonly insufficient light or the hamster is consuming them faster than they can establish. Use a small grow light on a timer (10–12 hours of light per day) and accept that edible plants will need regular replacing. |
| Springtails not thriving: Springtails require moisture to survive. If the enclosure is very dry, they will die off. Ensure the lower substrate layers retain some moisture—the surface can be dry while the substrate beneath remains appropriately damp. |
| Hamster refusing to use tunnels: Normal adjustment behavior in the first 1–2 weeks. Hamsters typically begin burrowing actively within 2–7 days of introduction. |
Is a Bioactive Setup Right for You?
A bioactive enclosure is a significant investment of time and money. It is the best welfare option available for pet hamsters—but it is not necessary to provide good welfare.
⚙️ A bioactive setup is ideal if:
- You have time for the 4–6 week establishment period before introducing the hamster.
- You enjoy the setup and maintenance process.
- You want to minimize full substrate changes.
- You want the highest possible enrichment level for your hamster.
⚙️ A standard setup with deep substrate is appropriate if:
- You need to house the hamster sooner.
- Budget is a limiting factor.
- You prefer a simpler maintenance routine.
The minimum requirements from the Hamster Care Guide—appropriate cage size, 15–20 cm (6-8 in) bedding depth, silent solid wheel—deliver good welfare in a standard setup. Bioactive is an upgrade, not a baseline requirement.
Conclusion
A bioactive hamster enclosure represents the highest level of environmental enrichment achievable in captivity for a pet hamster. When established correctly, it provides deep burrowing opportunities, foraging enrichment, visual complexity, and a self-maintaining ecosystem that reduces the frequency of disruptive full cleans.
The key to success is patience—the establishment period before introducing the hamster is not optional, and the cleanup crew colony needs time to reach viable numbers. Rush this step and the bioactive system will not function.
Key takeaways:
- ✅ Glass terrarium minimum 80 × 50 × 50 cm (31 × 20 x 20 in).
- ✅ Drainage layer first—always.
- ✅ Substrate: perlite-free topsoil + coconut coir + play sand.
- ✅ Minimum 20–30 cm (8–12 in) substrate depth.
- ✅ Allow 4–6 weeks establishment before introducing the hamster.
- ✅ Springtails + isopods are what makes it truly bioactive.
- ✅ Only use plants confirmed as hamster-safe.
- ✅ Silent solid wheel is still essential.
- ✅ Weekly toilet corner spot-clean remains necessary.
👉🏼 Small Pet Care Guide—complete hub for rabbits, guinea pigs, and hamsters.
👉🏼 Hamster Care Guide—core hamster care before building a bioactive setup.
👉🏼 Safe Vegetables for Small Pets—safe plants and foods for the bioactive environment.
👉🏼 Best Cages for Guinea Pigs—enclosure sizing and options for all small pets.

🐀 Browse small pet food, bedding, cages, toys, supplements and everything else your small pet needs 🐾
(This post contains affiliate links. If you purchase through our links, we may earn a small commission at no extra cost to you. This never influences our editorial opinions.)
FAQ: Bioactive Hamster Enclosure
How long does it take to set up a bioactive hamster enclosure?
The physical setup takes 2–4 hours. The establishment period—allowing plants to root, springtails to colonize, and the ecosystem to stabilize—takes 4–6 weeks. The hamster should not be introduced until this establishment period is complete. Rushing this step is the most common reason bioactive setups fail in the first weeks.
Can I use regular potting soil for the substrate?
Most commercial potting soils contain perlite, slow-release fertilizers, and sometimes pesticides—all of which are harmful to hamsters. Always check the ingredients and use only organic, perlite-free topsoil or a substrate specifically formulated for bioactive setups. Mix with coconut coir and play sand for the correct texture.
Will springtails and isopods harm my hamster?
No. Tropical springtails and Dwarf White Isopods are completely harmless to hamsters. They live in the substrate and feed on organic waste—the hamster is unlikely to interact with them, and even if consumed occasionally, they cause no harm.
How often do I need to do a full substrate change in a bioactive enclosure?
A well-functioning bioactive enclosure with an established cleanup crew can go 12–18 months without a full substrate change, compared to the monthly changes required in a standard setup. The toilet corner still needs weekly spot-cleaning, and a partial surface refresh every 3–6 months maintains the system. The significant reduction in full cleans is one of the main practical benefits of the bioactive approach.
My hamster is destroying all the plants. What should I do?
This is normal and expected—hamsters chew, burrow through, and consume plants. Focus on edible species (wheatgrass, herbs) that can be replaced easily, and add more robust non-edible plants (spider plant, sedum, haworthia) alongside the edible ones. Accept plant attrition as part of the system rather than trying to prevent it.
Is a bioactive enclosure more expensive than a standard setup?
The initial cost is significantly higher— £100–£350 / $120–$380 compared to £50–£100 / $60–$120 for a well-sized standard setup. However, the ongoing costs are lower due to reduced substrate replacement frequency. Over 12–18 months, the total cost difference narrows considerably.