
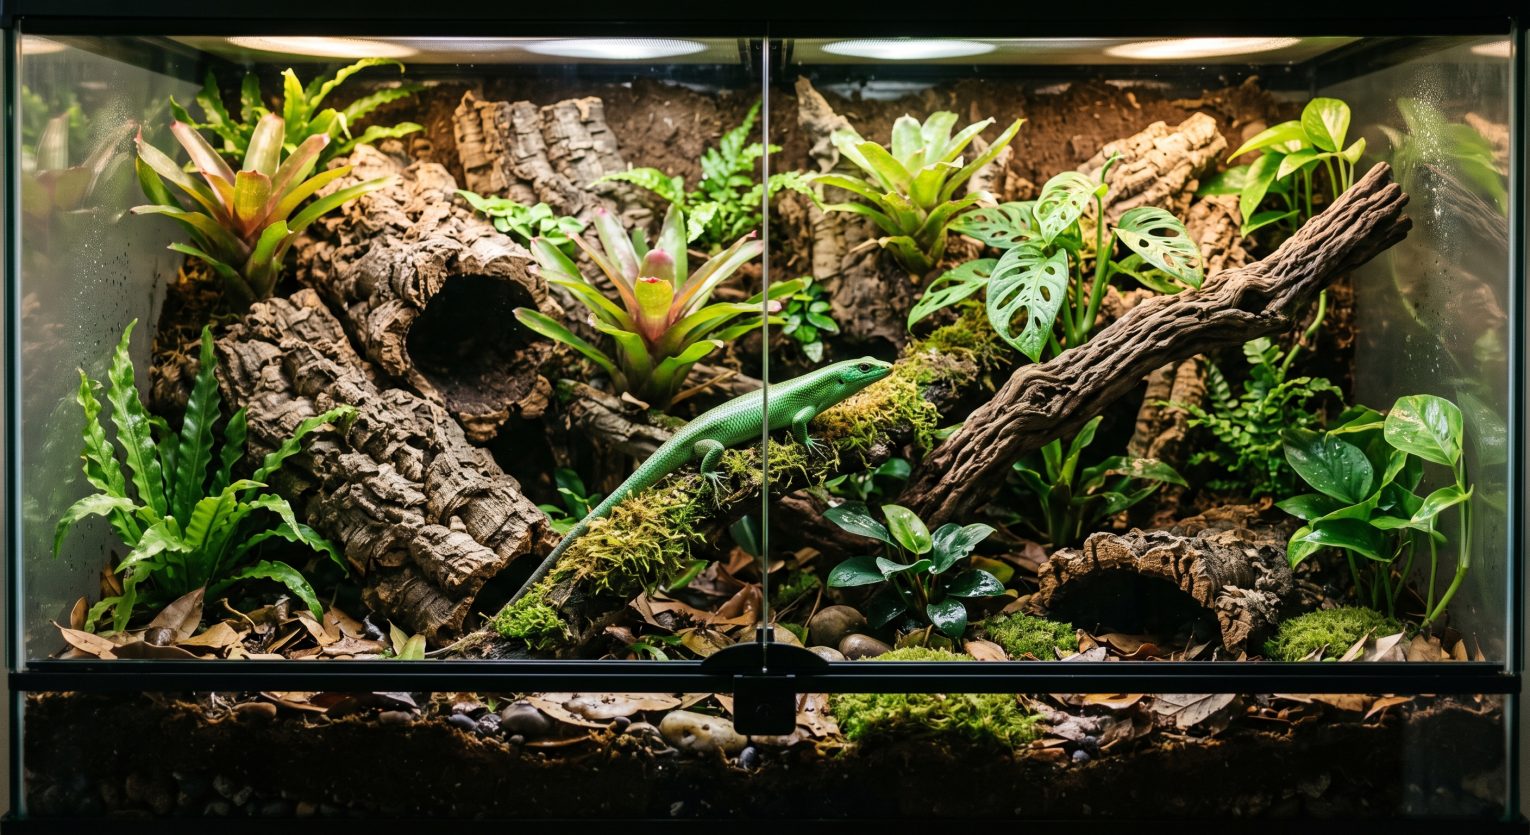
A bioactive terrarium is a self-sustaining ecosystem combining a drainage layer, live plants, and a cleanup crew of isopods and springtails that break down waste naturally—dramatically reducing manual cleaning while providing genuine enrichment. Contrary to common assumption, bioactive setups work well for both humid tropical species and arid desert species like bearded dragons and leopard geckos; the substrate mix, plant selection, and cleanup crew species simply differ based on your reptile’s natural humidity needs.
The core formula stays the same regardless of climate type: a drainage layer at the bottom, a barrier to keep substrate from washing into it, an appropriate substrate mix, live plants, leaf litter as a food source for your cleanup crew, and isopods paired with springtails to process waste. This guide covers both the arid and humid build paths in detail.
Bioactive setups are one advanced option covered in our Exotic Pet Care Guide—the complete hub for reptile diet, lighting, and habitat setup. This guide builds on the basic enclosure setup covered in Bearded Dragon Care Guide and Leopard Gecko Care Guide—read those first if you haven’t already established the basics for your species.
(💡 A properly built bioactive terrarium functions as a living ecosystem—reducing manual cleaning while giving reptiles genuine natural behaviors to express.
Table of Contents
What Makes a Terrarium “Bioactive”
A standard terrarium is a static environment— substrate absorbs waste until a full manual clean is required. A bioactive terrarium functions as a working micro-ecosystem instead.
✅ The three components that make it bioactive:
- An appropriate substrate layer that supports both plant root growth and cleanup crew habitation.
- Live plants, which provide cover, enrichment, and contribute to a stable, healthy environment.
- A cleanup crew—isopods and springtails living in the substrate that break down waste, shed skin, and leaf litter before it accumulates to harmful levels.
❕A properly functioning bioactive terrarium should have little to no odor, typically smelling like fresh soil or a forest floor. A bad smell signals something is wrong—usually an insufficient cleanup crew, a waterlogged drainage layer, or inadequate ventilation.
(🦎 Reptile Keeper’s Note: “The biggest misconception I hear is that bioactive only works for humid, tropical setups. Arid bioactive terrariums for species like bearded dragons and leopard geckos are genuinely well established—the substrate mix and cleanup crew species just need to match your specific climate type, not be forced into a one- size-fits-all tropical formula.”—LovingPetsGuide Reptile Advisor)
Step 1: Choose Your Build Path
Your species’ natural humidity needs—the same Ferguson zone framework covered in UVB Lighting for Reptiles—determines which substrate mix, plant selection, and cleanup crew species you’ll use.
Arid build: Suited to desert and semi-arid species including bearded dragons, leopard geckos, and similar low-humidity reptiles.
🌴 Humid/tropical build: Suited to species from rainforest or consistently humid environments.
Both paths share the same underlying structure— drainage layer, barrier, substrate, plants, cleanup crew—but the specific materials and species within each layer differ meaningfully.
Step 2: Build the Drainage Layer
Regardless of build type, excess water needs somewhere to go that doesn’t leave your substrate waterlogged—waterlogged substrate quickly turns anaerobic and kills the cleanup crew you’re trying to establish.
⚙️ Materials: LECA (Lightweight Expanded Clay Aggregate) or hydroballs, roughly 1–2 in (2.5–5 cm) deep, covered with a mesh or fleece barrier to prevent substrate from washing down and clogging the drainage layer over time.
❕For arid builds specifically: consider installing a length of pipe (slightly narrower than standard hose pipe) vertically through the drainage layer before adding substrate. This lets you water your plants from below, directly into the drainage layer, keeping the surface substrate dry while still delivering water to plant roots—exactly the dry- surface, hydrated-roots balance an arid bioactive terrarium needs. Hide the pipe opening behind a piece of cork bark once the build is complete.
📰 The bottom-watering technique for arid bioactive builds—installing a pipe through the drainage layer to water plant roots from below while keeping the substrate surface dry—is documented across established reptile husbandry resources as the standard method for balancing plant hydration needs against the dry surface conditions arid species require. The same sources confirm that damp substrate directly contacting plant bases in an arid build is a common cause of rot, reinforcing why bottom-watering matters specifically for this build type.
Step 3: Add the Substrate
Arid substrate mix: A sand/soil/clay blend, formulated specifically for low-organic, well- draining arid conditions—distinctly different from tropical mixes. Purpose-made arid bioactive substrate products are generally more reliable than DIY blends, since commercial potting soils often contain additives like perlite or fertilizers not appropriate for a reptile enclosure.
🌴 Humid/tropical substrate mix: A blend of organic topsoil, coconut coir, and orchid bark (commonly sold as “ABG mix,” originally developed at the Atlanta Botanical Garden) retains the higher, more consistent moisture tropical species and plants need.
📏 Depth: 4–6 in (10–15 cm) for most builds. The mix should clump when squeezed and crumble when released—a simple, reliable test for correct moisture balance before proceeding.
🐾 Bioactive Terrarium Substrate 🐾
🪨 Purpose-Made Bioactive Substrate Mixes — Formulated specifically for arid or tropical bioactive builds, avoiding the perlite and fertilizer additives common in general-purpose potting soil. Chewy carries both arid and tropical formulations—match to your species’ Ferguson zone.
Step 4: Add Hardscape and Plants
❕Position hardscape first—wood, rock, and cork bark—pressing pieces firmly into the substrate before planting so nothing shifts once your reptile starts exploring.
Plant selection by build type:
Arid builds: Hardy succulents and Mediterranean herbs (which naturally prefer warm, bright, well- drained conditions) both work well. Water arid plants through the drainage pipe from below rather than from the surface—damp substrate directly touching plant bases in an arid build commonly causes rot.
🌴 Humid/tropical builds: Broad-leaved tropical species tolerant of consistent moisture and lower light thrive in this substrate type.
⚠️ Consider UVB delivery when placing plants. Tall plants or substrate mounds positioned near your basking area can shade the UVB fixture’s output, meaningfully reducing the actual UV index reaching your reptile even with a correctly rated bulb. Keep the basking zone itself relatively clear, and use taller plants to define the terrarium’s edges or cooler zones instead.
Step 5: Introduce the Cleanup Crew
This is what makes the enclosure genuinely bioactive—without a working cleanup crew, it’s simply a planted terrarium.
🪲 Isopods (the “heavy lifters”): Break down larger waste—feces, shed skin, and leaf litter—into material your substrate’s microbiology can further process.
- Arid builds: Porcellio scaber or Armadillidium vulgare tolerate lower humidity (roughly 30–55% RH) well, provided a hidden moisture retreat—damp sphagnum moss under a piece of cork bark—is available.
- 🌴 Humid/tropical builds: Dwarf White isopods (Trichorhina tomentosa) are a widely recommended starting choice—small, burrowing, and reliable breeders in consistently humid conditions.
🐜 Springtails (the “mold police”): Handle fine- level mold and bacterial waste that isopods don’t address.
- Arid builds: Temperate springtail species (Folsomia candida) tolerate drier conditions, provided a damp retreat area exists.
- 🌴 Humid/tropical builds: Tropical springtail species suit consistently humid substrate.
❕Always pair isopods with springtails. Each handles a different waste category, and neither performs as well without the other present.
📰 The complementary roles of isopods and springtails in a bioactive cleanup crew are consistently documented across established bioactive keeping resources: isopods process larger organic waste including feces, shed skin, and leaf litter, while springtails target mold and bacterial-level decomposition that isopods don’t address. Species selection matched to humidity—hardier, drought-tolerant isopod and springtail species for arid builds versus moisture-dependent species for tropical builds—is identified as the most common point of failure when a cleanup crew colony doesn’t establish successfully.
🏁 Starting colony size: Roughly 25–50 isopods per 10 gal (38 L) of enclosure space, supplemented with leaf litter and occasional dried mushroom or fish flake as a food source until the colony is well established.
⚠️ Your reptile will likely eat some isopods—this is normal and expected. Choosing a smaller species like Dwarf Whites, and providing ample cork bark and leaf litter cover, helps the colony persist despite some predation.
🐾 Isopod & Springtail Cleanup Crew Cultures 🐾
🦠 Live Isopod & Springtail Starter Cultures — Always introduce both together—isopods handle larger waste, springtails handle mold and bacterial-level decomposition. Choose species matched to your build’s humidity: hardier species for arid setups, Dwarf Whites for tropical builds.
Step 6: Establishment Period Before Adding Your Reptile
🗓️ Allow 4–6 weeks for plants to root and the cleanup crew to establish a viable population before introducing your reptile. Adding your pet too early— before the ecosystem can actually process waste— undermines the entire point of building bioactive in the first place.
During this period, maintain appropriate temperature and, if applicable, run UVB on a normal schedule to support plant growth alongside the cleanup crew’s establishment.
Common Bioactive Terrarium Mistakes
| ❌ Using a tropical substrate mix for an arid species, or vice versa. Mismatched substrate and cleanup crew species for your build type leads to poor plant health, cleanup crew die-off, or both. |
| ❌ Skipping the drainage layer. Without it, excess moisture has nowhere to go, and waterlogged substrate quickly becomes anaerobic— killing the cleanup crew you’re building the whole system around. |
| ❌ Introducing your reptile before the establishment period ends. A 4–6 week head start lets plants root and the cleanup crew reach a genuinely functional population size. |
| ❌ No leaf litter. Leaf litter isn’t just decorative—it’s a primary food source for your cleanup crew. Skipping it starves the very organisms making the system bioactive. |
| ❌ Only adding isopods, or only springtails. Each handles a different waste category. A cleanup crew with just one or the other leaves a genuine gap in what the system can actually process. |
| ❌ Tall plants blocking UVB delivery to the basking zone. Covered in detail above—keep the basking area itself relatively clear of tall foliage. |
Conclusion
A bioactive terrarium represents one of the more advanced, welfare-positive habitat options available for reptile keepers—and contrary to common assumption, it works genuinely well for arid desert species, not just humid tropical setups. The formula stays consistent regardless of climate type: drainage, appropriate substrate, live plants, and a paired isopod-and-springtail cleanup crew, given time to establish before your reptile moves in.
Key takeaways:
- ✅ Bioactive works for both arid and humid species— the substrate mix and cleanup crew simply need to match.
- ✅ A drainage layer prevents waterlogged, anaerobic substrate that kills your cleanup crew.
- ✅ The bottom-watering pipe technique keeps arid substrate surfaces dry while plant roots stay hydrated.
- ✅ Always pair isopods with springtails—each handles a different waste category.
- ✅ Leaf litter is essential cleanup crew food, not just decoration.
- ✅ Allow 4–6 weeks establishment before introducing your reptile.
- ✅ Keep the basking zone clear of tall plants that could shade UVB delivery.
📝 Editor’s Note: Bioactive substrate composition, drainage layer setup, and cleanup crew species selection in this guide reflect consistent documentation across established reptile husbandry and bioactive keeping resources, including specific guidance on arid-suitable isopod and springtail species and the bottom-watering technique for maintaining dry substrate surfaces in arid builds.
👉🏼 Exotic Pet Care Guide—complete hub for reptile care essentials.
👉🏼 Bearded Dragon Care Guide: Diet, Heat & Habitat—the base setup this bioactive approach builds on.
👉🏼 Leopard Gecko Care Guide: The Best Beginner Reptile—another arid-bioactive-compatible species.
👉🏼 UVB Lighting for Reptiles: Which Bulb Does Your Pet Need?—Ferguson zones and lighting setup that inform your bioactive plant placement.
👉🏼 Best Reptiles for Beginners: Easy Species to Start With—species comparison including habitat complexity.

🐍 Browse exotic pet food, terrariums, lighting, heating, supplements and everything else your reptile needs 🐾
(This post contains affiliate links. If you purchase through our links, we may earn a small commission at no extra cost to you. This never influences our editorial opinions.)
FAQ: How to Set Up a Bioactive Terrarium
Can bioactive terrariums work for desert reptiles, or only tropical species?
Yes, arid bioactive setups work well for species including bearded dragons, leopard geckos, and similar desert or semi-arid reptiles. The substrate mix (sand/soil/clay rather than tropical ABG mix) and cleanup crew species (drought-tolerant isopods and temperate springtails) simply need to match the lower humidity requirement.
How long before I can add my reptile to a new bioactive terrarium?
Allow 4–6 weeks for live plants to root and your cleanup crew to establish a genuinely functional population before introducing your reptile. Adding your pet too early means the ecosystem hasn’t yet developed the capacity to process waste that makes bioactive setups work.
Will my reptile eat the isopods?
Yes, likely, and this is normal and expected rather than a sign of a failed setup. Choosing a smaller, fast-reproducing species and providing ample leaf litter and cork bark cover helps the colony persist despite some predation.
Why does my bioactive terrarium smell bad?
A properly functioning bioactive terrarium should smell like fresh soil, not unpleasant. A bad odor typically indicates a waterlogged drainage layer, an insufficient cleanup crew population, or inadequate ventilation—address the specific cause rather than just adding air freshener or increasing cleaning frequency.
Do I need both isopods and springtails, or is one enough?
Both. Isopods process larger waste like feces, shed skin, and leaf litter, while springtails handle fine-level mold and bacterial decomposition. Using only one leaves a genuine gap in what your cleanup crew can actually process, increasing the risk of mold blooms or waste accumulation.
Can I use regular potting soil for a bioactive substrate?
It’s not recommended. Most commercial potting soils contain perlite, synthetic fertilizers, or other additives inappropriate for a reptile enclosure. Purpose-made bioactive substrate mixes, formulated specifically for arid or tropical builds, are a more reliable choice.